CS16: Programming Assignment 01
Introduction
The assignment for this week is an introduction to programming on CSIL and in the Computer Science lab. You will write your first C++ program that will print specific text out to be read.
This assignment is due on January 9th at 23:59.
Top
Step 1: Create an Engineering Account
To log in to the machines in the Computer Science labs, or to connect remotely, you will need a College of Engineering account.
Before beginning with the assignment, go through this pdf file that has information about your College of Engineering (CoE) account and also some common issues faced by students.
You can create an account online at https://accounts.engr.ucsb.edu/create.
If you are enrolled in any CoE course this quarter (including CS16), you can create your account immediately. If you are not, you will need to contact the ECI Help Desk at help@engineering.ucsb.edu.
Top
Step 2: Open a Terminal
The first step in every assignment will be to open a terminal window, which will be the environment you use to write, compile, and run your programs.
If you are working on a machine in the Computer Science lab in Phelps 3525, go to Step 2a.
If you are working on your laptop and it is a Mac or Linux machine, go to Step 2b.
If you are working on your laptop and it is a Windows machine, go to Step 2c.
Step 2a: Opening a Terminal on a Phelps Lab Machine
Log in to the machine using account details created in Step 1.
Find the “Activities” menu, which is in the top-left corner of the screen. Click on it to open the menu.
Next, type “shell” into the search box. Then click the “Terminal” application which appears.
You should now see a terminal window open. You can open more tabs or windows from the Terminal application's menu.
Step 2b: Connecting to CSIL via SSH on Mac OS X or Linux
To get started on Mac OS X or Linux, you first need to open a terminal program. This involves slightly different steps on either OS.
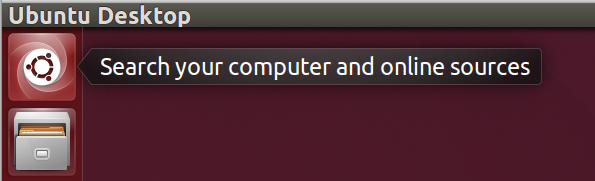
On Ubuntu (an example Linux distribution), you will first want to find the search menu. It appears at the top of the Unity bar:
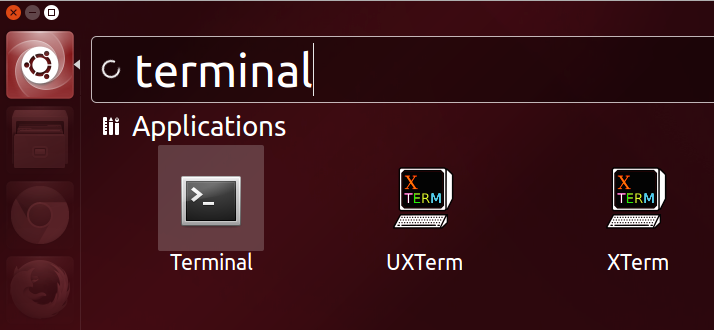
Click on that icon to open the search menu. Then type “terminal” and click on the “Terminal” application which appears:
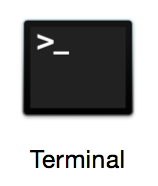
On Mac OS X, open the “Terminal” application. It is found inside the Applications folder of your main drive, inside the Utilities subfolder. The icon looks like this:
You can also find it using Spotlight by typing “terminal” and pressing enter.
Once you have a terminal window open on your machine, you next need to connect to the CSIL server remotely. This will be done using a program called SSH.
Type the following command in your terminal, replacing USERNAME with your CSIL username:
$ ssh USERNAME@csil.cs.ucsb.edu
SSH will first ask you a question which looks like this:
The authenticity of host 'csil.cs.ucsb.edu (128.111.43.14)' can't be established.
RSA key fingerprint is 90:ab:6a:31:0b:81:62:25:9b:11:50:05:18:d3:1a:b5.
Are you sure you want to continue connecting (yes/no)?
Type yes to continue. It will next ask for your CSIL account password. When you type it in, nothing will show on the screen. However what you type is still being sent and once you are finished with your password, you can press enter to login.
You should now be remotely connected to CSIL! You can make sure by typing the following command (which will tell you what machine you are currently issuing commands to):
$ hostname
This should show csil.cs.ucsb.edu. You can now do anything you could normally do in a terminal window in CSIL or the Phelps lab (except run graphical programs).
Extra Note: Graphical Forwarding
This is not required or necessary to use CSIL remotely, so if you are not interested, go ahead and skip this part.
If you have an X windows system installed you can get graphical applications running by forwarding X from CSIL to your machine. To do this, add the -X option to the SSH command like this:
$ ssh -X USERNAME@csil.cs.ucsb.edu
X windows is almost always installed on graphical Linux, and can be installed on Mac OS X as XQuartz (which can be found at http://xquartz.macosforge.org/landing/).
Doing this on the CSIL server will be very slow, since the server is shared between everyone logged in. For better performance, use one of the CSIL workstation names as your SSH destination instead. You can find a list of the workstations at http://www.cs.ucsb.edu/~don/machines/csilmap.php. To login to a workstation, just replace “CSIL” with the name of the workstation. For example, to login to mickey:
$ ssh -X USERNAME@mickey.cs.ucsb.edu
Step 2c: Connecting to CSIL via SSH with PuTTY
To connect remotely on Windows machines, we recommend using a program called PuTTY. This program is a well-known and widely-used SSH client for the Windows OS.
First, download the program from http://www.chiark.greenend.org.uk/~sgtatham/putty/download.html. You only need putty.exe, but feel free to download any other programs that you want. The page includes portable versions and an version with an installer. Always make sure to download PuTTY from this site, so that you can make sure it is the correct program.
Then open PuTTY like you would open other programs. If you just download the putty.exe file, you can open it from your downloads folder directly. You can also move it to any other location on your machine and open it from there. If you used the installer, open PuTTY from the Start Menu.
When PuTTY opens, you should see a window that looks like this:
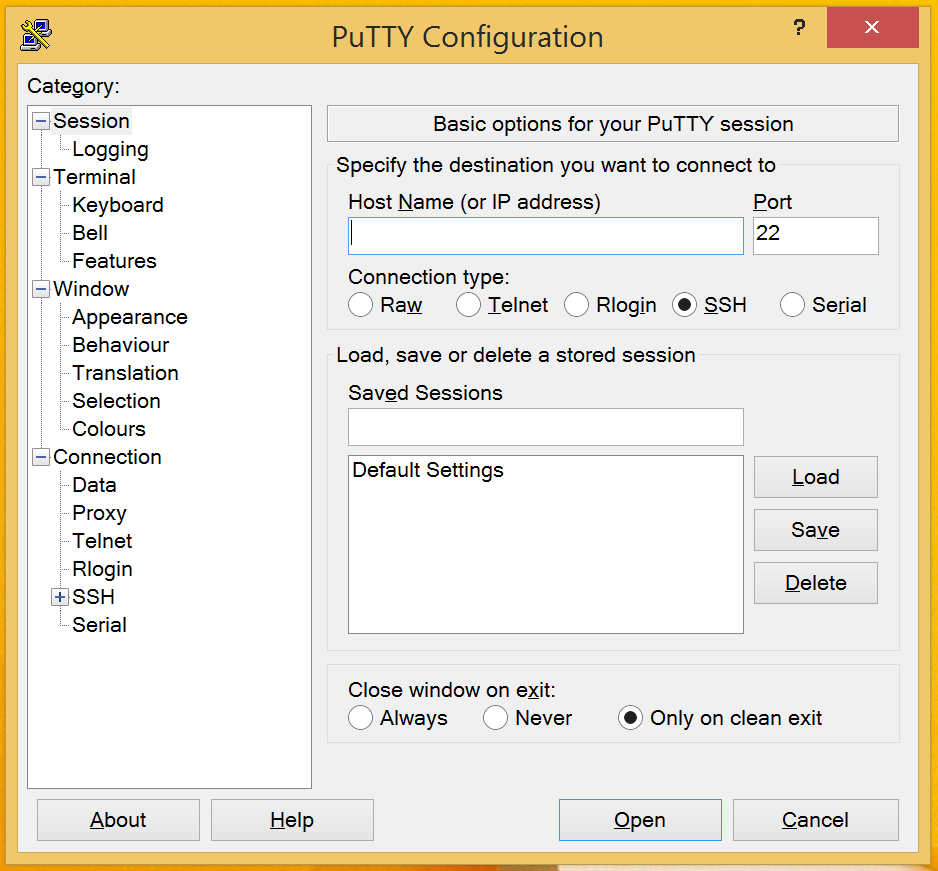
Type csil.cs.ucsb.edu into the box labeled “Host Name (or IP address)”. Leave the “Port” setting as 22 and leave the “SSH” button checked. The window should now look like this:
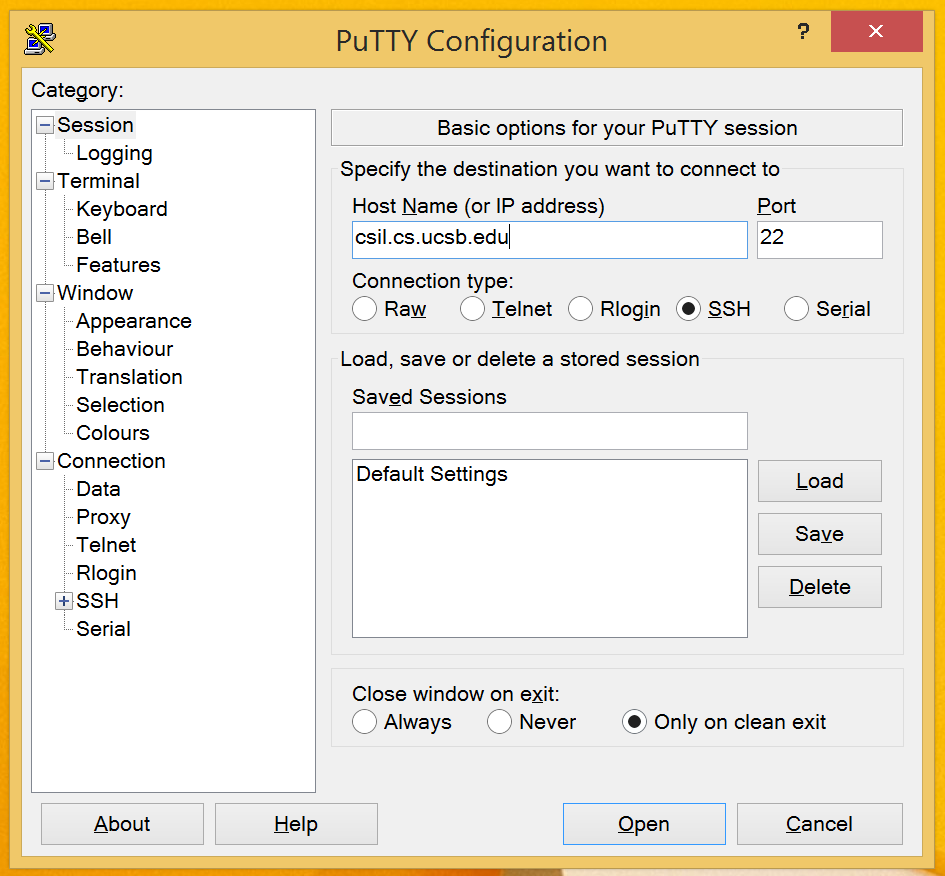
Then click on the “Open” button to connect. PuTTY will then show a prompt which looks like this:
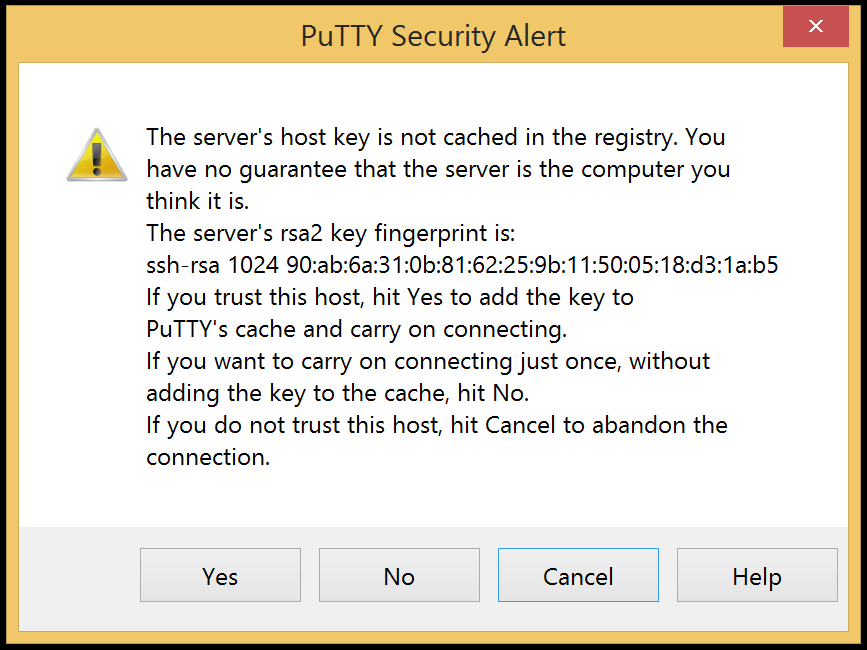
Click “Yes” to accept and remember CSIL's key.
Once a connection is made, CSIL will ask for both your username and then your password. Type in your CSIL username and password. The password will not be shown on the screen, but the characters you type are being used. This step will look something like this (with your username instead of “username”):
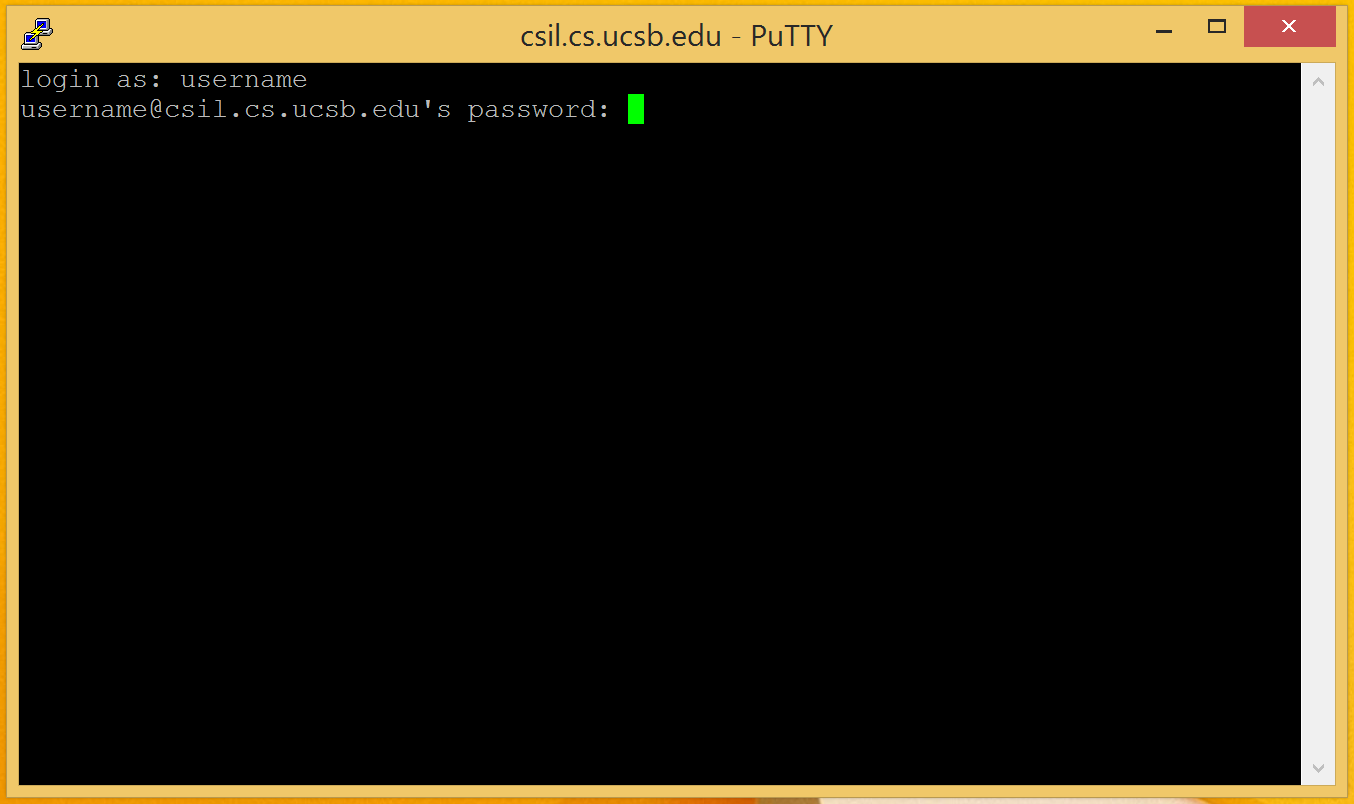
Once you have logged in successfully, you should be connected remotely to the CSIL server. Run the following command to make sure (this command shows the full host name of the machine you are logged in to):
$ hostname
This command should output csil.cs.ucsb.edu. You can now do anything in this terminal window that you could do on a CSIL machine or a Phelps lab machine, except run graphical applications.
Top
Step 3: Create CS16 and Programming Assignment 01 Directories
Now that your environment is set up, you next will need to create a directory (a folder is also called directory in Linux) that will contain all your work for the course. Then, inside that directory, you will need to create another directory to contain your work for this assignment.
To create your CS16 directory, use the mkdir command. Type the following in the terminal and press enter:
$ mkdir cs16
The $ represents the terminal prompt; you won't type this character. Whenever you see it, that means that the following command is intended to be typed into the terminal window and run by pressing enter.
You can see list of files and directories in the current directory with ls command. Type the following in the terminal and press enter:
$ ls
You should be able to see the directory you just created i.e. cs16
Now move into that new CS16 directory with the cd command as follows:
$ cd cs16
And create and move into a PA 01 directory:
$ mkdir pa01
$ cd pa01
At any time, you can check what directory you are current in with the command pwd. It will output the full path of the current directory. For example, if you are inside your pa01 directory, you might see:
/cs/student/yourcsilname/cs16/pa01
Top
Step 4: Create a C++ File
Now that we have a directory to contain our work for the assignment, let's start writing our code. Create a file called hello.cpp with the touch command:
$ touch hello.cpp
hello.cpp is now a completely empty file that you will use throughout the rest of the assignment to write your C++ code.
Top
Step 5: Edit hello.cpp
To put text inside the hello.cpp file, you will need to use a text editor.
We will describe how to use the gedit graphical text editor, which you can use on Phelps lab machines or CSIL machines, and the emacs editor, which you can use any time (including when connected remotely).
To open the hello.cpp with gedit, you can use the following command:
$ gedit hello.cpp
You can then edit the file. Make sure to save the file frequently to avoid lost work.
Alternatively, or if you are logged in remotely, you can edit the file with emacs using the following command:
$ emacs hello.cpp
If you have never used emacs before, a short tutorial can be found in Step 5a.
You are not required to use one of the two mentioned editors. If you are more comfortable with another installed editor (such as vim), you are free to use it. However, the TAs and Professor may not be able to answer all questions about any given editor.
Step 5a: Using emacs
Once emacs is open, you can start editing the file immediately. To move around, use the arrow keys.
emacs commands usually take the form C-x C-c. This means press and hold the control key then press the x key, then next press and hold the control key and press the c key. You can also hold the control key and then press x and c in succession. In contrast, the command C-x 1 means press and hold the control key, then release the control key and then press the 1 key.
Some useful commands are:
- C-x C-c closes emacs
- C-x C-s saves the current file
- C-x 1 closes all other panes except the current one (you can use this close the help panel)
- C-g at any point in a command will cancel the command
- C-k “kills” or cuts the current line, and C-y “yanks” or pastes the line back at the cursor location
You can find a comprehensive beginners guide to emacs at http://www.jesshamrick.com/2012/09/10/absolute-beginners-guide-to-emacs/.
You can find a reference card (that prints on one page front and back) that includes a huge number of common emacs commands at https://www.gnu.org/software/emacs/refcards/pdf/refcard.pdf.
Top
Step 6: Write the Code
Now it is time to write the program! This assignment only needs to print out two lines, and nothing else. The output should look exactly as follows (no space before or after each line, except the newlines):
Hello, world!
CS16 Winter 2016.
Start with a skeleton program that contains the necessary structure but that does not do anything:
#include <cstdio>
#include <iostream>

using namespace std;

int main() {
    // Your printing code should go here

    return 0;
}
Go ahead and type this in to the hello.cpp file. Alternatively, you can copy and paste it directly from this page.
Next, you will need to replace the comment with code to print out the expected output. Comments in C++ are lines that start with // or text between /* and */. The second type can span multiple lines.
Important note: For students familiar with Python, remember that lines starting with the # character are not comments in C++. Rather, they are important include lines that allow your program to use the input and output functionality. Make sure to copy those lines in your program as well. Only // or /* create comments in C++.
To print out text to the terminal, you can use the cout stream. To output something use the << operator as shown below:
cout << "This will be printed out to the terminal" << endl;
The endl will cause a newline to be printed and the next print to go on the next line.
You can adapt this line to achieve the objective of the assignment. Remember that we need to print two lines, each with a newline at the end. You can do this with one statement or with two.
Top
Step 7: Compile the Code
Now that the code is written, we need to compile it. This will be done using a special program called a compiler.
Before moving on, make sure you save your code and close the text editor. The following step will be done in the terminal.
For C++ code we will use the g++ compiler. You can compile the hello.cpp file into an executable called hello with the following command:
$ g++ -std=c++11 -o hello hello.cpp
This will make an executable version of your code. Specifically, it will tell the compiler to take the source code file hello.cpp and compile and link it to an executable called hello. It also tells the compiler to use C++11, which is the C++ version we will use throughout the course. But you don't have to worry about the specifics for now.
If the compilation is successful, you won't see any output from the compiler. You can then use the following command to run your program:
$ ./hello
Which means in the current directory, represented by the . character, run the program hello. You should see the program output the two expected lines.
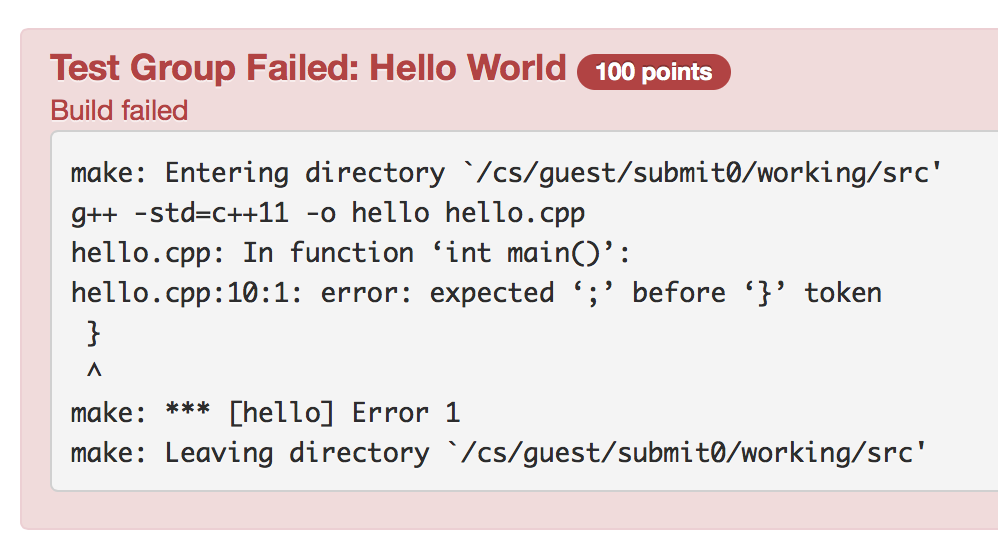
The other possibility is that the program does not compile successfully. In this case, you might see output that looks like:
hello.cpp: In function ‘int main()’:
hello.cpp:10:1: error: expected ‘;’ before ‘}’ token
 }
 ^
The compiler will try to give you hints on the line (in this case 10) where the error occurs, and also what the error is (in this case a missing semicolon).
If you encounter an error, use the compiler hints and examine the line in question. If the compiler messsage is not sufficient to identify the error, you can search online to see when the error occurs in general. Once you have fixed the error, run the compilation command again.
Top
Step 8: Submit
Once you are satisfied that your program is correct, it is time to submit it.
Please remember that you must submit the program to obtain any credit for the assignment; just completing the program is not enough.
In this course we will use the submit.cs.ucsb.edu system. You can make a submission from either the command line on any CS machine, or from a browser.
If you don't have a submit.cs account, you will first need to create one. This can be done at https://submit.cs.ucsb.edu/form/user.
Once you have an account created, login at https://submit.cs.ucsb.edu/session.
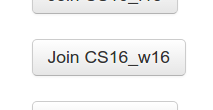
Next, you need to join the CS16 course. Look for the “Join Class” link at the top of the page. It is in the top bar, seen below:

Once you see the list of all courses, click on the “Join CS16_w16” button. It looks like this:
You should then see CS16 appear on your homepage when logging in to the submit.cs system. Click on the course now.
Now find “pa01” and click on the “Make Submission” button. It looks like this:

This is the web interface for submitting your code for the assignment. You can upload your source file directly on this page. The browser will open a dialog, and you will need to navigate to the directory containing your hello.cpp file and select it.
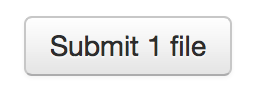
Once your file is uploaded, click “Submit 1 File”:
Once you submit, you should see a page detailing your submission. The system will automatically grade your program and will show you the results on this page after a 1 minute delay.
You can alternatively submit your code from the command line (terminal) on any CS machine, including the Phelps lab machines or the CSIL server. You can use this method when logged in remotely. To submit the the hello.cpp file to this assignment by running the command:
$ ~submit/submit -p 410 hello.cpp
The program will ask you to login with your submit.cs username and password. The password will not be printed to the terminal, but what you type will be used. It will also offer the option to save your credentials, so that you do not have login next time you submit. You may choose to do this or not. After the submission succeeds, you should see the program output something like:
Results will be available at: https://submit.cs.ucsb.edu/submission/xxxxx
You can copy this URL and paste into a web browser to reach the same submission result page as described above.
Top
Step 9: Check Submission Results
After the 1 minute delay, the submit system will show your score and give you feedback on your submission. Refresh the webpage after a minute to see this information. This usually takes one of three forms:
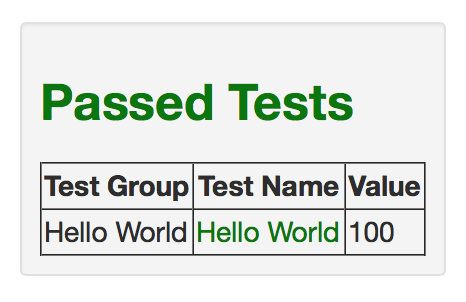
A correct submission with a score of 100. This means that your program passed all the tests for this assignment. Once you get to this point, you are finished with the assignment and will receive full credit. This case will look like this:
An incorrect submission with a score of 0 to 99. This means that your program failed 1 or more of the tests. For this assignment, the system will show both the expected output and the output your program generated side-by-side so that you can see what went wrong. You will need to fix your program, and then do Step 8 again to re-submit. This case will look like this:

Or a submission for which compilation failed. This means that your program caused compilation errors when the system tried to compile it. You will need to interpret the compiler output and fix the errors. The system will show you the compilation command that failed along with the full error message. This case will look like this:
You may submit multiple times. You should submit only after local compilation does not produce any errors and runs as expected. The score of the last submission uploaded before the deadline will be used as your assignment grade.
Top
Step 10: Done!
Once your submission receives a score of 100/100, you are done with this assignment. Congratulations on completing your first C++ program!
If you are in the Phelps lab or in CSIL, make sure to log out of the machine before you leave. Also, make sure to close all open programs before you log out. Some programs will not work next time if they are not closed. Remember to save all your open files before you close your text editor.
If you are logged in remotely, you can log out using the exit command:
$ exit